Archive | Home Decor RSS feed for this section

Pink heart shaped dutch oven under $45

30 Jan

Just in time for Valentine’s Day, I found a heart shaped dutch oven that is a dupe for the very pricey Le Creuset version. Both are gorgeous, but the Le Creuset version will set you back $200. If that is out of your budget, no need to worry, just click HERE to shop the $45 version. I actually like the dupe better because it has gold detail.

Images of both versions are pictured below.

Le Creuset $200 (pictured below)

Beautiful by Drew Barrymore $44.97 (pictured below)

Let’s Talk Terrariums!

28 Feb

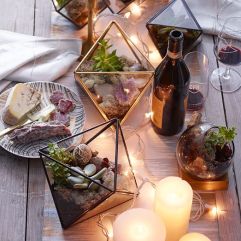
I’ve been getting so many questions about my cute little terrarium and thought I’d share all the information with you here. First of all, if you don’t know what a terrarium is, don’t fret. I’m sure you’ve seen them around. A terrarium is an enclosed, indoor garden, usually small and made of glass so that you can see your collection of plants. Before I knew that they were called terrariums, I was searching for ‘Geometric plant holder” and open air vase” on Pinterest and google until I purchased mine from West Elm.

terrarium1

Now that we’ve covered the name, let’s talk about how cute terrariums are and how neat it is to have a living piece of art in your home. I also love how low maintenance they are- I literally mist mine with a spray bottle once a week and nothing more. Making it was quick and easy as well (and I am NOT a crafty person). It took me about 20 minutes total. Pinterest gave me inspiration and I looked up you tube videos on how to layer the terrarium in different ways and chose the look of white rocks on the bottom to match my current gold and neutral theme. Some people incorporate sand as well as tiny figurines. I kept mine more minimal and layered it starting on the bottom with white rocks, then added some dirt from outside, planted succulents in the dirt, then topped it off with some moss. It’s fun to make them your own!

I bought the succulents, white rocks, and moss from Home depot and the actual terrarium is from West Elm. I definitely recommend a terrarium if you want to add a cool piece of living breathing art to your home. They are easy, affordable and super cute!!!

Shop my Terrarium (pictured below) HERE Also, these particular terrariums come in 3 sizes. Check the dimensions so you get exactly what you’re looking for. Mine is the ‘small’ size. They also have extra small and large. 

t2

Smells like Christmas!

21 Dec

Happy Wednesday everyone 🙂 I hope you’re all having an amazing day filled with joy and laughter. I also hope your day is filled with beautiful scents -seriously. If you follow me on snapchat (jfilkosky1) you know that I’m obsessed with my wax warmer from Target. I always wish you guys could smell what I’m smelling. This wax warmer is EVERYTHING!!! It’s priced under $20 and is a super cute brass design. I love that it’s a plug-in that has a switch as well. So if it’s plugged in a hard to reach outlet, you can just switch it on and off easily instead of bending all the way down to unplug it. The thing I like most about this wax melter, though, is the fact that it has a huge light bulb to melt the wax. I feel like the scents are really amplified with the heat! The light bulb keeps the wax so hot that the scent is strong and I can’t get enough. A lot of warmers have a small votive candle that is somehow supposed to melt wax and scent your home. unfortunately I’ve never had luck with those.  I use my wax warmer year round, but especially during the cold months which is why I’m sharing it with you now. Also it would make a great gift for a loved one or even for a co-worker gift exchange.

Wax warmer and wax melts available at Target18821915.jpeg

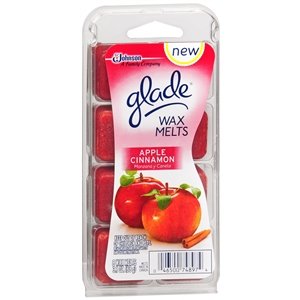
Pictured below are the Glade wax melts as well as Home scents brand which is the cheaper store brand and they both smell amazing.

melts-2melts

Bar Cart Style! (Updated)

14 Mar

Hallelujah, I have finally finished styling my bar cart! I didn’t know exactly how I wanted to style it when I first started, all I knew was that I wanted a gold cart with 3 shelves. I started brainstorming and decided on a mostly pink and gold palette. As far as what to put on the shelves, I had to have a cute ice bucket and a pitcher with roses, everything else came to me as I went along. Bar carts are popping up everywhere and for good reason!  They are a fun way to showcase your personality and style, while being totally functional at the same time. When I have people over, my cart will be put to very good use. I love fresh flowers, pink and gold- my bar cart is all of that and more. To say I’m obsessed would be an understatement!

  Now, let’s get to the important stuff…..where did I find everything and how much did I spend?

Let me start by saying if you google ‘bar cart’ right now, you will quickly notice that they can be upwards of $500+!! For the cart alone! BEFORE you style it with all your fun trinkets, alcohol, mixers etc. Let me also tell you that if you really look, you CAN FIND AN AFFORDABLE CART! Check out these Prices below…..I spent under $300 for everything pictured including liquor and mixers.

*Bar Cart $150( I got it on sale for $119), Ice Bucket with tongs $30, silver cocktail spoon $3, Silver muddler $5, glass fruit bowl $2. All from Cost Plus world Market.

*Pitcher/Vase $8 at Home Goods.

*Crystal Decanters $40(I got them on sale for $20)each at Macy’s

*Corkscrew and shaker I already had, but you can find them at Bed Bath & Beyond.

*Mason jar $1, pink straws $5, Glass sugar bowl with lid $4, Key shaped bottle opener $4 all  from Target.

*Hand stamped decanter tags $10 each at Etsy shop Seize the night designs.

*Booze and mixers all from Total Wine

*Roses $7 at Trader Joes


Styling tips: Stick to 2-3 main colors. Fresh flowers are always a good idea and I really love the look of fruit as well. Fill the shelves, but don’t overpack them. Make it your own, add personal touches.

UPDATE: Pink sugar cubes have arrived and are in the tiny glass bowl with lid, I also purchased teeny tiny tongs from Crate &Barrel.

My Bar cart is complete!!!!

Custom sugar cubes available at Etsy shop Heather Holidays.


My Bedroom Makeover!

7 Dec

I’ve been wanting a tufted bed for a couple of years now and was unsure if I should just get a headboard or an entire bed frame. After shopping around, I decided to go with the entire bed frame SINCE IT WAS SO AFFORDABLE at Target! Once I purchased the bed frame, I went ahead and got two bedside tables as well. When the beautiful bed arrived and I felt weird just throwing my old mattress on there, soooooo I bought a new mattress and box spring at living Spaces. The new bed pretty much snowballed into practically all new bedroom furniture and accessories…. Once the complete bed was set up the night stands arrived, I needed lamps and cute decor so off I went to Lamps plus, Z Gallerie, Macy’s and Home Goods. Fast forward 2 weeks and my bedroom makeover is complete. I am so happy with it and wanted to share where I purchased everything from since most of them were BARGAINS! Minus the bedding- I went a little “fancy” with the bedding.

Anyhow, let’s get into the good stuff….places to purchase and prices.


 TARGET:

Tufted Bed: $400!!!! YES for the entire bed! That is cheaper than most headboards alone. (took 2 hours for 2 people to put together)

Night Stands: $139 each (took 1 hour for 1 person to put together)

LAMPS PLUS:

Lamps: $35 each Yes $70 for 2 gorgeous lamps. I chose 19″ lamps because my bedside tables are tall and I didn’t want the lamps to be taller than the headboard.

HOME GOODS:

Decorative snowflake pillow: $25

Jewelry box: $6

Isaac Mizrahi picture frame: $5

Magnifying Glass: $7

Mrs. & Mrs. Ring dish: $3

Small square vase: $4

MACYS:

All bedding Lauren by Ralph Lauren

Comforter: $220 (on sale now for $109)

Sheet Fitted: $115

Sheet Flat: $115

Pillow Cases: $90

OVERSTOCK:

Safavieh Faux Fur pillows: 2 for $80

Z GALLERIE:

Perfume bottle coin bank $20

HOME DEPOT:

Fancy knobs: 2 for $7!! This was a great way to elevate the look of my nightstands. they came with black knobs, so I chose crystal knobs with gold base. Very pretty.


Gallery Wall Success!

24 Aug

Gallery walls are having a major moment right now. Gallery walls are basically an arranged artistic display of things that matter to you most including mirrors, pictures, arts & crafts, frames, Initials etc. There are really no rules when it comes to a well hung gallery wall, it’s really all about what you think works for your space.   I recently finished my gallery wall and have some tips that I want to share with you that made it easier for me.

Gallery walls are a process (mine took 6 weeks to complete) but don’t fret, YOU GOT THIS! One picture at a time.

Supplies & Art:

Hammer & nails, tacky glue, mounting putty (behind the frames that wouldn’t stay put), gold paint, sandpaper (to distress some of the frames)

*Mirror, clock, and framed elephant art available at Target.

*Twine wrapped Letter ‘F’, gold paint, decorative keys, tweed heart, and oval wood piece with keyhole ceramic piece all available at Michaels.

*Weathered brown frame (upper right) available at West Elm.

*All other frames available at Home Goods.


Gallery Wall Tips:

* Check Pinterest and Instagram Check these sites for gallery walls to see what styles, colors and arrangements you like.

*Everyone Can afford a gallery wall: My gallery wall pictured above includes only 2 pricey pieces, the rest are super affordable pieces (hello $25 mirror) mixed with DIY stuff.  Don’t let your budget stop you! Also, Don’t limit yourself to only store-bought items. If you love a particular frame in your home, you can paint it to match your theme. There are youtube tutorials for EVERYTHING and you can watch step by step videos on sanding, staining and painting frames.

*Make it your own: pick a color palette. I chose ivory, black & gold. All of your art doesn’t need to match, but having 2-3 primary colors makes it more cohesive when completed. I also went with only black & white prints and photos to keep things uniform.

*Don’t be afraid to use different frames: Different sizes, shapes & colors only add to the greatness of your gallery wall.

*Lay it out:  I cannot stress enough to lay out your gallery wall arrangement BEFORE putting anything on the wall. I layed mine out on the floor, changed it around a few times, took pictures and compared the pictures until I was happy with the arrangement.

*All in the family: Tie your gallery wall colors in with your surrounding couch, blankets, coffee table, and throw pillows. This keeps everything cohesive within the space.

*Hang time: Hang your artistic representation any way you want. I keep reading all sorts of rules about arranging your gallery wall, but just remember- it is YOUR gallery wall so hang it how you want. As long as it’s balanced with shapes & spacing, your gallery wall will be just fine. Speaking of spacing: The wall is your friend- the space between your art is just as important as the art itself. I started with putting my largest piece up and went from there. I chose to not put the largest piece dead center. I feel like that would be expected and it can cause your eye to be drawn toward that piece and not all of the fun stuff around it.

Breathe: You can do it!