Tag Archives: how to

Let’s Talk Terrariums!

28 Feb

I’ve been getting so many questions about my cute little terrarium and thought I’d share all the information with you here. First of all, if you don’t know what a terrarium is, don’t fret. I’m sure you’ve seen them around. A terrarium is an enclosed, indoor garden, usually small and made of glass so that you can see your collection of plants. Before I knew that they were called terrariums, I was searching for ‘Geometric plant holder” and open air vase” on Pinterest and google until I purchased mine from West Elm.

terrarium1

Now that we’ve covered the name, let’s talk about how cute terrariums are and how neat it is to have a living piece of art in your home. I also love how low maintenance they are- I literally mist mine with a spray bottle once a week and nothing more. Making it was quick and easy as well (and I am NOT a crafty person). It took me about 20 minutes total. Pinterest gave me inspiration and I looked up you tube videos on how to layer the terrarium in different ways and chose the look of white rocks on the bottom to match my current gold and neutral theme. Some people incorporate sand as well as tiny figurines. I kept mine more minimal and layered it starting on the bottom with white rocks, then added some dirt from outside, planted succulents in the dirt, then topped it off with some moss. It’s fun to make them your own!

I bought the succulents, white rocks, and moss from Home depot and the actual terrarium is from West Elm. I definitely recommend a terrarium if you want to add a cool piece of living breathing art to your home. They are easy, affordable and super cute!!!

Shop my Terrarium (pictured below) HERE Also, these particular terrariums come in 3 sizes. Check the dimensions so you get exactly what you’re looking for. Mine is the ‘small’ size. They also have extra small and large. 

t2

Bar Cart Style! (Updated)

14 Mar

Hallelujah, I have finally finished styling my bar cart! I didn’t know exactly how I wanted to style it when I first started, all I knew was that I wanted a gold cart with 3 shelves. I started brainstorming and decided on a mostly pink and gold palette. As far as what to put on the shelves, I had to have a cute ice bucket and a pitcher with roses, everything else came to me as I went along. Bar carts are popping up everywhere and for good reason!  They are a fun way to showcase your personality and style, while being totally functional at the same time. When I have people over, my cart will be put to very good use. I love fresh flowers, pink and gold- my bar cart is all of that and more. To say I’m obsessed would be an understatement!

  Now, let’s get to the important stuff…..where did I find everything and how much did I spend?

Let me start by saying if you google ‘bar cart’ right now, you will quickly notice that they can be upwards of $500+!! For the cart alone! BEFORE you style it with all your fun trinkets, alcohol, mixers etc. Let me also tell you that if you really look, you CAN FIND AN AFFORDABLE CART! Check out these Prices below…..I spent under $300 for everything pictured including liquor and mixers.

*Bar Cart $150( I got it on sale for $119), Ice Bucket with tongs $30, silver cocktail spoon $3, Silver muddler $5, glass fruit bowl $2. All from Cost Plus world Market.

*Pitcher/Vase $8 at Home Goods.

*Crystal Decanters $40(I got them on sale for $20)each at Macy’s

*Corkscrew and shaker I already had, but you can find them at Bed Bath & Beyond.

*Mason jar $1, pink straws $5, Glass sugar bowl with lid $4, Key shaped bottle opener $4 all  from Target.

*Hand stamped decanter tags $10 each at Etsy shop Seize the night designs.

*Booze and mixers all from Total Wine

*Roses $7 at Trader Joes


Styling tips: Stick to 2-3 main colors. Fresh flowers are always a good idea and I really love the look of fruit as well. Fill the shelves, but don’t overpack them. Make it your own, add personal touches.

UPDATE: Pink sugar cubes have arrived and are in the tiny glass bowl with lid, I also purchased teeny tiny tongs from Crate &Barrel.

My Bar cart is complete!!!!

Custom sugar cubes available at Etsy shop Heather Holidays.


Gallery Wall Success!

24 Aug

Gallery walls are having a major moment right now. Gallery walls are basically an arranged artistic display of things that matter to you most including mirrors, pictures, arts & crafts, frames, Initials etc. There are really no rules when it comes to a well hung gallery wall, it’s really all about what you think works for your space.   I recently finished my gallery wall and have some tips that I want to share with you that made it easier for me.

Gallery walls are a process (mine took 6 weeks to complete) but don’t fret, YOU GOT THIS! One picture at a time.

Supplies & Art:

Hammer & nails, tacky glue, mounting putty (behind the frames that wouldn’t stay put), gold paint, sandpaper (to distress some of the frames)

*Mirror, clock, and framed elephant art available at Target.

*Twine wrapped Letter ‘F’, gold paint, decorative keys, tweed heart, and oval wood piece with keyhole ceramic piece all available at Michaels.

*Weathered brown frame (upper right) available at West Elm.

*All other frames available at Home Goods.


Gallery Wall Tips:

* Check Pinterest and Instagram Check these sites for gallery walls to see what styles, colors and arrangements you like.

*Everyone Can afford a gallery wall: My gallery wall pictured above includes only 2 pricey pieces, the rest are super affordable pieces (hello $25 mirror) mixed with DIY stuff.  Don’t let your budget stop you! Also, Don’t limit yourself to only store-bought items. If you love a particular frame in your home, you can paint it to match your theme. There are youtube tutorials for EVERYTHING and you can watch step by step videos on sanding, staining and painting frames.

*Make it your own: pick a color palette. I chose ivory, black & gold. All of your art doesn’t need to match, but having 2-3 primary colors makes it more cohesive when completed. I also went with only black & white prints and photos to keep things uniform.

*Don’t be afraid to use different frames: Different sizes, shapes & colors only add to the greatness of your gallery wall.

*Lay it out:  I cannot stress enough to lay out your gallery wall arrangement BEFORE putting anything on the wall. I layed mine out on the floor, changed it around a few times, took pictures and compared the pictures until I was happy with the arrangement.

*All in the family: Tie your gallery wall colors in with your surrounding couch, blankets, coffee table, and throw pillows. This keeps everything cohesive within the space.

*Hang time: Hang your artistic representation any way you want. I keep reading all sorts of rules about arranging your gallery wall, but just remember- it is YOUR gallery wall so hang it how you want. As long as it’s balanced with shapes & spacing, your gallery wall will be just fine. Speaking of spacing: The wall is your friend- the space between your art is just as important as the art itself. I started with putting my largest piece up and went from there. I chose to not put the largest piece dead center. I feel like that would be expected and it can cause your eye to be drawn toward that piece and not all of the fun stuff around it.

Breathe: You can do it!

Pretty AND Protected!!!! (wear makeup & SPF, you don’t have to choose)

10 Jul

I am INSANE about skin protection and wear SPF 50 year round and 110 during the sunny months. I wear it alone and with my makeup as well. Most days I don’t wear makeup, but when I do I have perfected a routine that allows me to protect my skin, wear a full face of makeup AND reapply SPF throughout the day if necessary. The key to ultimate sun protection is to apply SPF under and over your makeup! YES this is easy and possible, I will list my routine below with product links. *Let this also be a reminder that the SUN IS ENEMY #1 when it comes to your skin aging, the sun “cooks” your skin- it’s as simple as that. Even in small doses, it adds up. Be mindful when you’re in the sun and get into an SPF routine NOW if you haven’t already and buy some cute hats & sunglasses while you’re at it.  Protect your skin at all costs or it will cost you…..best case scenario- you will have crows feet and leathery skin way too early. Worst case scenario- skin cancer. Love the skin you’re in 🙂 nf It’s never too late. Get started now, let me show you how! (My personal SPF & makeup routine, step by step) 1. Apply SPF on clean skin. I use Neutrogena SPF 110. 2. Let it soak in for 5 minutes. I walk away, brush my teeth, pet the dog….whatevs. 3.Apply face makeup. My full makeup consists of BB Cream and Bare Minerals powder foundation, followed by highlight, contour, eye makeup, blush etc. 4. Once makeup is gorge and “done” apply SPF powder ON TOP of everything. Bare Minerals has a translucent powder called Mineral veil- it basically locks in your makeup and it almost creates an air brushed look to the skin. Why is this last step so unique? Mineral veil is available with SPF 25, so it is adding an extra layer of protection. This also allows you to reapply SPF throughout the day by dusting some powder on.  Mineral veil comes in original for fair to medium skin tones and tinted for medium to dark skin tones. I have both and mix them for a gorgeous shade. There is No need to go and throw out your current makeup/foundation. Any makeup works as the FIRST and LAST steps include SPF.  This has been working wonders for me and I hope it can help you too.

Instagram Roundup!!!!

11 Mar

It’s that time again……my life in iPhone pictures! AKA my Instagram roundup! Enjoy and follow me on Instagram @Yourstylejourney to see more!

IG12 IG11 IG10 IG9 IG8 IG7 IG6 IG5 IG4 IG3 IG2 IG1

Valentine’s Day Nail Inspiration ’14!

30 Jan

It’s almost that time of year again!!! Valentine’s Day is in two weeks and all of you nail art lovers need to decide what you’ll do this year for the day of love! Last year I shared some Valentine’s Day nail inspiration and it got so much traffic, so I’m doing it again this year! These are some of my favorites that I came across on Pinterest! So many cute ideas!

Click HERE for a quick and easy way to create a heart on your nails!

vn1 vn2 vn3 vn4 vn5 vn6

Vn2 vn3 vn4vn6 vn7 vn8 vn9 vn10 vn11 vn12 vn13

The Best Eye Makeup Remover Ever!!! (and My Personal Eye/Skin Care Tips)

2 Nov

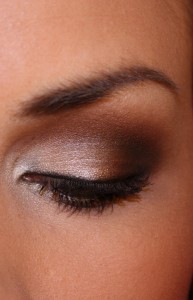
I thought that this post was fitting as I was fully made up for a Halloween party last night and was NOT look forward to washing off my makeup when I got home.   I dressed up as a cat and painted on a nose and whiskers with Urban Decay 24/7 eyeliner (which stays put) and set it with black eyeshadow so I already knew it was going to be a struggle to remove.  When I create a smokey eye or wear dark lip color, I always turn to my Clinique ‘Take the day off’ makeup remover and it comes through for me every time!  This particular remover is for lids, lashes and lips.  I don’t know about you but my high pigmented lipsticks DO NOT come off with a swipe of a tissue, so this makeup remover is a god send for me.  I have never had success with makeup removers in the past, they smeared my makeup, were sticky and made me have to RUB my eye area which is a no-no, but this product gave me hope in makeup remover once again!  As for my Halloween makeup, I had no problem at all and was pleasantly surprised at how easily it swiped off  without pressing hard or scrubbing like I have with makeup removers in the past.  With this formula, a little goes a long way! I just put a few drops on a cotton ball and swiped!

Ladies- rubbing your eye makeup off contributes to wrinkles and unnecessary puffiness and this product just glides along your skin smoothly while removing all your makeup!  It is fantastic and if you’re looking for a makeup remover for your eyes and lips- this product will not let you down!  Clinique has a few more makeup removers for the entire face which I’m sure work just as well but I have yet to try them.

Clinique ‘take the day off’ Makeup Remover.

1.7 oz $9.50

4.2 oz $18

Clinique

My personal eye area/skin tips:  ( the cold hard truth)

Ever seen a baby with freckles? Neither have I.  I saw that quote in one of my mom’s magazines as a kid and have always remembered that.

Freckles come from the sun, PERIOD!  Of course some people are more prone to them and are fair-skinned, but the majority of us can avoid them all together if we give it a small effort.

Always be present when you are in the sun- always remember the baby freckle quote. Sure we all accumulate freckles throughout our lives but just keep in mind that they come directly from the sun.  I like to think of them as “little burns” on my skin that stay forever and turn into large sun spots when we’re older!  NOT CUTE!  Aging gracefully is beautiful, premature aging is NOT!

Do I always avoid the sun? No way Jose- I love sunny days but you better believe I’m slathered in SPF and wearing sunglasses or a hat. Also I always look to sit in the shade and always stay aware! It’s all about being aware! I am never that girl who accidentally gets a crazy sunburn- it just won’t happen because I’m aware.

Buy sunglasses and wear them every time you leave the house!  You’d be surprised how much you squint- even when it’s not sunny. Don’t like sunglasses, get a cute hat. (tinted windows on your car also help)

Smoke? STOP. Those lovely vertical lines that surround your upper lips will only get worse. Don’t have any yet? They’re on their way!  The repetitive motion of puckering your lips to inhale that cigarette is slowly forming wrinkles!

Drink much? Slow down. Excessive drinking does cause premature wrinkles. Read this!

No rubbing your eyes- just don’t.

Be aware when applying and removing makeup- use eyeliner much? Think about every time you pull down your under eye to expose your waterline to apply the liner, every day, sometimes twice a day. Be very careful when you do this not to over pull- most people never even think about it  but to expose your waterline the under eye barely needs to be moved if even at all!

Tummy sleeper? Think about how you smash your face all night long every night.  Side sleeper? Notice wrinkles on one side of your face more than the other? You probably sleep on that side.  Scrunching your cheeks up against a pillow for 8 hours a night can cause unsightly crows feet and around the mouth wrinkles ( also known as parenthesis wrinkles). Want to avoid this? sleep on your back.  Ladies who sleep on their backs have less wrinkles! It’s true!

Apply eye cream nightly? Apply with your ring finger as it the weakest and won’t put unnecessary pressure to the area.  Also use small soft upward strokes to apply the moisturizer.

Always always always treat the under eye/eye lid area like tissue! Literally baby that skin and it will look like baby skin!  Treat it rough and it will look rough.

Don’t moisturize? Start NOW!  I started at 20, you’re never too young!  Find an eye cream and a facial moisturizer ASAP! Use them both daily!

Give your skin the time!  It’s takes only 10 minutes a day to wash and moisturize your face 2 times!  Wash your face and moisturize every night- no matter how tired you are.

Drink water-  hydration is just good for everything!

Do expensive products work better? Most of the time YES, however affordable products can get the job done too. Something is better than nothing if you’re on a budget.

Already have wrinkles? It’s never too late….. who needs more wrinkles? nobody. You can still delay future wrinkles from appearing! Don’t be discouraged!

My silly analogies:

Dry Beef Jerky vs. Juicy Steak

Wrinkled Raisins vs.  Juicy Grapes

What do you want your skin to be? I wanna be grapes and steaks!

I do believe all skin eventually wrinkles in some degree, but I think those wrinkles can be delayed for many many years if you put in the time and effort!

Lilac Nails A Summer Must!

25 May

I’m so in love with lilac nails lately!  The pale purple shades looks great on all skin tones and is so feminine. Lilac is a nice way to incorporate some purple into your wardrobe without going into dark grape territory. Ranging from pale pinkish hues to deeper greyish hues, there is a lilac for everyone. What lilac shade works for you?

Jenna Dewan Jessica Alba lilac Lilac nails 2 Lilac nails 3 Lilac nails 4 lilac nails 5 Lilac nails1 Lilac toes Nicky Hilton gets her nails done at Beverly Hills Nail Design on June 24, 2008 in Beverly Hills, California purple nails


Shop lilac nail colors below.


Bangle Jangle by Essie $8 at Zappos.

Bangle jangle


Lilacism by Essie $8 at Zappos.

Lilacism


Play Date by Essie $8 at Zappos.

Play date


Neo Whimsical by Essie $8 at Nordstrom.

Neo Whimsical

Great Makeup Guides! (highlighting/contouring and eyes)

4 Dec

Here are some great steps to follow that can help you whether you are experienced or just starting to wear makeup!  I feel like the two hardest “makeup” techniques to master are highlighting & contouring and creating the perfect smokey eye.  Below I have chosen my favorite guides to achieve these looks.

As far as highlighting & contouring goes, Keep in mind all face shapes and bone structures are different so you don’t have to follow the illustrations exactly, they are just guides to help you. Don’t worry everything will be fine after you blend blend blend!


EYES:

Brow


The guide above can help you achieve these looks…..


2 3


1


Weren’t born with chiseled cheekbones? Don’t fret neither were most of the models or celebrities you see in magazines.

H&C 2

H&C3


Where to highlight???highlights


How to


Highlighting and contouring works on all skin tones!  Below are some beautiful examples including some before and afters.Deeper skin tone

Fair


Fair skin


Love her or hate her, Kim Kardashian has absolutely mastered highlighting & contouring….

KK


Her achieved look is gorgeous!

KimK

Scarves: The Cold Weather Essential

11 Nov

Scarves are a cold weather staple!  They can be dressed up or down and are not only cozy and functional, but very fashionable too.  From sheer to knit to colorful prints, there are so many scarves to choose from.  Besides my boots, my scarf collection is my favorite part of my Fall/Winter wardrobe.

Check this out! My favorite “how to wear” scarf video HERE! 25 ways to wear a scarf in under 5 minutes!

Some scarf inspiration……