Tag Archives: tips

Kauai (My favorite FREE things to Do)

26 Mar

Let me just start by saying Kauai is the BEST island if you want “post card” Hawaii. No freeways, no skyscrapers on the beach. Just lush green everywhere you look, laid back vibes, beautiful beaches and waterfalls.

It hasn’t even been 2 weeks since my wife and I have been back from Kauai and we miss it so much already. This trip was our 5th to the beautiful garden island, so I feel like it’s the appropriate time to share my budget friendly ‘Must Do’ list with the world. Below I will list- in no particular order my absolute favorite Must Dos when you’re visiting Kauai. And by budget friendly, I mean FREE!!!k3

Ke’e Beach– (North shore)Literally the last stop at the end of the road. Full of chickens, this beach is lagoon like and is enclosed with a beautiful reef that keeps the water very calm (perfect for snorkeling). I like to bring snacks and water and chill at this beach for hours!

kauai38k9

KalaLau Trail– (North Shore) This 11 mile (each way) trail along the Na Pali coast is one of the most breathtaking and dangerous hikes in the world. It takes expert hikers an entire day to complete but most people usually hike it in 2 days and camp overnight to rest. Even if you aren’t an avid hiker, you can still safely hike up about a mile or two and see some of the most amazing views for FREE!  To hike and camp the full 22 mile round trip, a permit is required. *pictured below is the view from KalaLau Trail looking down on Ke’e beach.img_3106

Queen’s Bath– Princeville (North Shore) Queen’s bath is pretty much a natural swimming pool enclosed by rocks-inside of the ocean. It is a must see and a must swim spot(when the tide is CALM) People literally die here because they underestimate the power of the ocean. If you use common sense, you’ll be fine. If the ocean looks rough, just observe this beauty from afar.

kauai29

Hanalei– (North shore)this super cute Hawaiian town is my favorite in all of kauai. It’s laid back with plenty of shops and restaurants. The beaches are gorgeous and the view looking out from Hanalei Pier is worth writing home about. Do not skip this town, or their adorable fruitstand!

kauai34kauai44

Kapaa– (East Shore)This town is located more centrally on the island and has great beaches, a long bike path along the coast, and endless restaurants and shops including bike and snorkel rentals.  Our favorite mexican restaurant Verde’ is located in Kapaa. One of my favorite hikes ( Ho’Opi Falls) is here as well. The hike follows along a gorgeous river that leads to multiple waterfalls, and there is also a fun rope swing too! *kids can definitely do this hike.  ho'opi

Kapaa is where I suggest you stay for your first Kauai trip because it is so centrally located that you can see all of the island if you plan it out right. My advice is to schedule your activities according to location so you save precious time driving. You can hit up the entire north shore in a day (or more if you want some relaxing beach time) The same goes for the East and South shores.  For example: The same day that you hike Ho’opi Falls in the morning is the same day you should do lunch and shopping in Kapaa.

k13k14

Poipu/Old Koloa town- (South Shore) These are two seperate towns that are about 7 minutes apart. If you visit one, you should visit the other. Poipu is the biggest “touristy” area on the island. Lots of restaurants and shops. Koloa town is an adorable tiny town with cute shops, restaurants and food trucks. We had some of the best pizza of our lives there (twice)!! Their pizza by the slice is no joke! Something not to miss in the koloa area is Spouting Horn park! When you’re at spouting Horn park, be sure to shop for small trinkets from the vendors here, they have the BEST PRICES on the island!

Makauwahi Cave-(South Shore)This super cool cave is at the end of a short hike and you enter by crawling through a small entry hole. The Cave is the largest limestone cave in Hawaii! There is a tortoise sanctuary about 3 minutes from the entrance of the cave, which is amazing! The cave and the tortoise sanctuary are both FREE but a donation is suggested. ($5 is good) See directions to the cave HERE and be warned that the dirt road there is VERY BUMPY. We had a 4×4 and still parked the car just below the nearby horse stables and walked to the cave. This excursion was so great because it started with petting horses, then a nice hike along the coast, followed by a really cool cave, and then tortoises! I highly recommend this adventure! Also the cave is  located near all the shops and restaurants in the Poipu/Koloa area so you can visit those areas too! All in the same day!

Sleeping Giant hike- (East Shore)This hike was about 3 hours round trip. We hiked all the way up to sleeping giant’s head. There were a couple of steep parts, but we made it, and the view of Kauai from the top was amazing!

gisnt

Wailua Falls-(East shore) This is a must see and you don’t even have to hike to it(unless you want to illegally climb over a fence, ignore the signs, and hike down a STEEP cliff hoping that you reach the bottom without dying or getting arrested)! You can just park and walk 20 feet to see the famous twin falls. They are massive and beautiful! There are much longer trails leading down that are guided and will lead to the base of the falls and are much safer than the WILD WAY DOWN!

DAREDEVILS…. keep reading.  For those of you interested in hiking down the fast way, it is doable in sneakers and if you are an experienced hiker. If you aren’t sure footed, do not try hiking down. It’s a short (20 min) but very steep hike. There are some points where you are hanging onto a rope installed by locals to scale down the cliff. I would never suggest hiking it on a rainy day. With that being said, once you get down, it is so worth it!!!

My wife Pictured below. We hiked down in 2016. We did NOT hike down on our most recent trip because it was raining.

kauai46

Hopefully my list helped you if you’re looking to vacation in Kauai:) Comment below if you have any questions.

Also-There are tons of great things to do in Kauai that do cost money like helicopter rides along the Na Pali coast, dinner on a sailboat, zip lines, kayaking, ATV rides, and Luaus (Smith’s luau is my favorite). Enjoy planning your trip!

Thanks for reading,

Journey

My Paris Trip!

16 Jun

I  recently arrived back home to Los angeles from a dream vacation to Paris with my wife. I was so satisfied when the trip ended and I looked back at all that we had done- We did everything on our list and more. As promised, here are just some of our many pictures below. Paris is considered to be a trip of a lifetime for most and it did not disappoint. Bucket list…..Check!

Random travel tips:

*Exchange your money before you go to save a bit on the exchange rate and save time waiting in line at the French airport.

*Learn a few common phrases in French. ‘hello, goodbye, thank you, how much’ etc.

*Get the international data plan your phone carrier offers, it’s worth it. My plan was just $10 a day to use data in France.

*Don’t forget to bring outlet converters (specifically for France) so that you can charge your electronics, including your phone.

*Indulge!!!! Counting calories can be done when you get back home! There is also plenty of walking to offset the overeating you will do! We walked 10-15 miles a day!

Paddle boat at the garden of Versailles.19148932_10212162476991423_6470749387562051714_n

Chocolate sculptures were unreal.19145726_10212162697516936_9159886990439975182_nVersailles rowboats and garden were literally straight out of a fairy tail.19114023_10212162853560837_7596937829662730331_n19060218_10212162482031549_5673358027957423239_nWe really became familiar with the metro.19059275_10212162926762667_7693657593912451727_nThe eiffel tower was amazing, and picnicking under it was priceless. We found an amazing place by the name of Cafe Zia that prepared a picnic to go that included wine and a blanket for under 60 euros. It was one of my favorite experiences on our trip.19029770_10212162477591438_2453970744740841579_n

Me- right before Nina surprised me with a beautiful band to add to my wedding stack. It was beyond romantic. I will never forget that moment.

boat
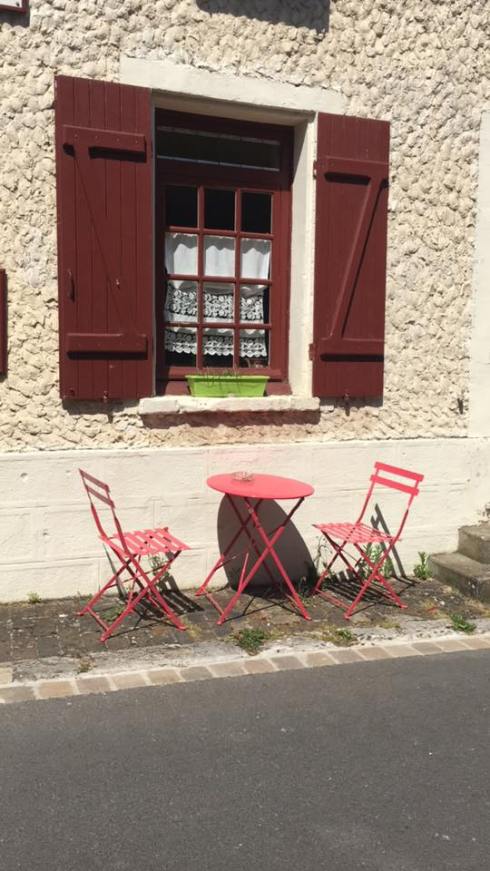
A cafe nestled in the french countryside in a town called Giverny.cafe countrysideUnderground catacombs where the remains of over 6 million people are stored. The bones were neatly stacked to the ceiling and it went on for miles.catacombsfranceGardens of Versailles.gardenGolden gates of Versailles.gateGiverny.givernyMontmartre.montemartreCarousel ride across the street from the eiffel tower.
parisSo many beautiful blooms in Paris. I was obsessed!paris2Pajama party in our hotel!pjs

Gallery Wall Success!

24 Aug

Gallery walls are having a major moment right now. Gallery walls are basically an arranged artistic display of things that matter to you most including mirrors, pictures, arts & crafts, frames, Initials etc. There are really no rules when it comes to a well hung gallery wall, it’s really all about what you think works for your space.   I recently finished my gallery wall and have some tips that I want to share with you that made it easier for me.

Gallery walls are a process (mine took 6 weeks to complete) but don’t fret, YOU GOT THIS! One picture at a time.

Supplies & Art:

Hammer & nails, tacky glue, mounting putty (behind the frames that wouldn’t stay put), gold paint, sandpaper (to distress some of the frames)

*Mirror, clock, and framed elephant art available at Target.

*Twine wrapped Letter ‘F’, gold paint, decorative keys, tweed heart, and oval wood piece with keyhole ceramic piece all available at Michaels.

*Weathered brown frame (upper right) available at West Elm.

*All other frames available at Home Goods.


Gallery Wall Tips:

* Check Pinterest and Instagram Check these sites for gallery walls to see what styles, colors and arrangements you like.

*Everyone Can afford a gallery wall: My gallery wall pictured above includes only 2 pricey pieces, the rest are super affordable pieces (hello $25 mirror) mixed with DIY stuff.  Don’t let your budget stop you! Also, Don’t limit yourself to only store-bought items. If you love a particular frame in your home, you can paint it to match your theme. There are youtube tutorials for EVERYTHING and you can watch step by step videos on sanding, staining and painting frames.

*Make it your own: pick a color palette. I chose ivory, black & gold. All of your art doesn’t need to match, but having 2-3 primary colors makes it more cohesive when completed. I also went with only black & white prints and photos to keep things uniform.

*Don’t be afraid to use different frames: Different sizes, shapes & colors only add to the greatness of your gallery wall.

*Lay it out:  I cannot stress enough to lay out your gallery wall arrangement BEFORE putting anything on the wall. I layed mine out on the floor, changed it around a few times, took pictures and compared the pictures until I was happy with the arrangement.

*All in the family: Tie your gallery wall colors in with your surrounding couch, blankets, coffee table, and throw pillows. This keeps everything cohesive within the space.

*Hang time: Hang your artistic representation any way you want. I keep reading all sorts of rules about arranging your gallery wall, but just remember- it is YOUR gallery wall so hang it how you want. As long as it’s balanced with shapes & spacing, your gallery wall will be just fine. Speaking of spacing: The wall is your friend- the space between your art is just as important as the art itself. I started with putting my largest piece up and went from there. I chose to not put the largest piece dead center. I feel like that would be expected and it can cause your eye to be drawn toward that piece and not all of the fun stuff around it.

Breathe: You can do it!

The Best Eye Makeup Remover Ever!!! (and My Personal Eye/Skin Care Tips)

2 Nov

I thought that this post was fitting as I was fully made up for a Halloween party last night and was NOT look forward to washing off my makeup when I got home.   I dressed up as a cat and painted on a nose and whiskers with Urban Decay 24/7 eyeliner (which stays put) and set it with black eyeshadow so I already knew it was going to be a struggle to remove.  When I create a smokey eye or wear dark lip color, I always turn to my Clinique ‘Take the day off’ makeup remover and it comes through for me every time!  This particular remover is for lids, lashes and lips.  I don’t know about you but my high pigmented lipsticks DO NOT come off with a swipe of a tissue, so this makeup remover is a god send for me.  I have never had success with makeup removers in the past, they smeared my makeup, were sticky and made me have to RUB my eye area which is a no-no, but this product gave me hope in makeup remover once again!  As for my Halloween makeup, I had no problem at all and was pleasantly surprised at how easily it swiped off  without pressing hard or scrubbing like I have with makeup removers in the past.  With this formula, a little goes a long way! I just put a few drops on a cotton ball and swiped!

Ladies- rubbing your eye makeup off contributes to wrinkles and unnecessary puffiness and this product just glides along your skin smoothly while removing all your makeup!  It is fantastic and if you’re looking for a makeup remover for your eyes and lips- this product will not let you down!  Clinique has a few more makeup removers for the entire face which I’m sure work just as well but I have yet to try them.

Clinique ‘take the day off’ Makeup Remover.

1.7 oz $9.50

4.2 oz $18

Clinique

My personal eye area/skin tips:  ( the cold hard truth)

Ever seen a baby with freckles? Neither have I.  I saw that quote in one of my mom’s magazines as a kid and have always remembered that.

Freckles come from the sun, PERIOD!  Of course some people are more prone to them and are fair-skinned, but the majority of us can avoid them all together if we give it a small effort.

Always be present when you are in the sun- always remember the baby freckle quote. Sure we all accumulate freckles throughout our lives but just keep in mind that they come directly from the sun.  I like to think of them as “little burns” on my skin that stay forever and turn into large sun spots when we’re older!  NOT CUTE!  Aging gracefully is beautiful, premature aging is NOT!

Do I always avoid the sun? No way Jose- I love sunny days but you better believe I’m slathered in SPF and wearing sunglasses or a hat. Also I always look to sit in the shade and always stay aware! It’s all about being aware! I am never that girl who accidentally gets a crazy sunburn- it just won’t happen because I’m aware.

Buy sunglasses and wear them every time you leave the house!  You’d be surprised how much you squint- even when it’s not sunny. Don’t like sunglasses, get a cute hat. (tinted windows on your car also help)

Smoke? STOP. Those lovely vertical lines that surround your upper lips will only get worse. Don’t have any yet? They’re on their way!  The repetitive motion of puckering your lips to inhale that cigarette is slowly forming wrinkles!

Drink much? Slow down. Excessive drinking does cause premature wrinkles. Read this!

No rubbing your eyes- just don’t.

Be aware when applying and removing makeup- use eyeliner much? Think about every time you pull down your under eye to expose your waterline to apply the liner, every day, sometimes twice a day. Be very careful when you do this not to over pull- most people never even think about it  but to expose your waterline the under eye barely needs to be moved if even at all!

Tummy sleeper? Think about how you smash your face all night long every night.  Side sleeper? Notice wrinkles on one side of your face more than the other? You probably sleep on that side.  Scrunching your cheeks up against a pillow for 8 hours a night can cause unsightly crows feet and around the mouth wrinkles ( also known as parenthesis wrinkles). Want to avoid this? sleep on your back.  Ladies who sleep on their backs have less wrinkles! It’s true!

Apply eye cream nightly? Apply with your ring finger as it the weakest and won’t put unnecessary pressure to the area.  Also use small soft upward strokes to apply the moisturizer.

Always always always treat the under eye/eye lid area like tissue! Literally baby that skin and it will look like baby skin!  Treat it rough and it will look rough.

Don’t moisturize? Start NOW!  I started at 20, you’re never too young!  Find an eye cream and a facial moisturizer ASAP! Use them both daily!

Give your skin the time!  It’s takes only 10 minutes a day to wash and moisturize your face 2 times!  Wash your face and moisturize every night- no matter how tired you are.

Drink water-  hydration is just good for everything!

Do expensive products work better? Most of the time YES, however affordable products can get the job done too. Something is better than nothing if you’re on a budget.

Already have wrinkles? It’s never too late….. who needs more wrinkles? nobody. You can still delay future wrinkles from appearing! Don’t be discouraged!

My silly analogies:

Dry Beef Jerky vs. Juicy Steak

Wrinkled Raisins vs.  Juicy Grapes

What do you want your skin to be? I wanna be grapes and steaks!

I do believe all skin eventually wrinkles in some degree, but I think those wrinkles can be delayed for many many years if you put in the time and effort!

Beauty Tips from a Breast Cancer Survivor

4 Oct

I just came across this Marie Claire article and I thought it was pretty amazing and very helpful!

Click HERE to read the article.

Lip Tips!

14 Aug

Today I was asked what I would do with an almost new, broken lipstick…. In my teen years I would have thrown it away and begged my mom to buy me a new one.  A few years back I would have put it in an old lip balm container and used a brush to apply, Now a days I would do it differently.  My favorite lipstick saving tip is Not throwing it away or cramming it into another container…. I just take the broken piece in my hand with a tissue, find matches or a lighter, then slowly wave the flame under the broken piece.  When it barely starts to get warm, I put it back on the base, swivel it down carefully and put it in the refrigerator -uncovered for 30 minutes. I have come across so many random lipstick tips over the years, some working great and others, not so much.  Today I’ll share with you which ones work for me, hopefully you will also find them helpful.

First things first…..Keep lips hydrated, soft and smooth.

Make sure to gently exfoliate lips with a soft bristled toothbrush or a sugar scrub weekly.  I apply a moisturizer, then gently brush my lips in a circular motion, exfoliating the skin while moisturizing simultaneously. Also apply lip balm/moisturizer whenever possible… If you wear lipstick all day, apply balm/moisturizer when you get home and or before bed.

Fan of lipliner?

Some people swear by lipliner while others have no use for it.  I sometimes use it with darker lip color to prevent feathering of the color. Day to-day, I don’t use it.  However my greatest piece of lipliner advice is to pick a color that is the SAME  TONE AS YOUR LIPS, NOT your lip color.  My reasoning is….. a flesh toned liner will ensure that- should your lip color happen to fade, you won’t be left with a dark outline. We all know that is not a good look.

Looking for a “stained” lip look?

Apply a nice even coat of lipstick, then blot- twice. This will leave behind an evenly colored lip with a very natural looking stain.

My definition of blotting….. is using blotting sheets from your local beauty store OR kissing a piece of paper ( I prefer post-its). I don’t like blotting with traditional tissue because  they leave behind linty particles.

How to make your lipstick last.

Apply a nice even coat of lipstick straight from the tube, blot, then apply a second coat of lipstick. It will last all day and is very easy to do.  Blotting creates a nice base and the second coat adds the final touches (shine & coverage). When aiming for staying power, applying lipstick straight from the tube as opposed to using a lipbrush gives a richer application of color. Also I found that I don’t like applying powder to make lipstick last because my lipstick tends to get cakey, even with the lightest powder application and the “powder over a tissue” method simply is a lot more work for the same result..

Looking for a long-lasting colored ‘shiny’ lip?

Apply an even base coat of lipstick and finish the look off with a lipgloss in a similar shade as your base lipstick, which will achieve a high pigmented shine. There are plenty of great colored glosses out there, Lancome Juicy Tubes and MAC lip glass are some of my favorites.