Tag Archives: trend

Choked Up!

8 Sep

Chokers are back y’all! Well, they’ve been back for a while, but they’re catching on like wildfire. I’m old enough to remember when chokers were all the rage in the 90’s. They are definitely back with a vengeance~ as are the entire 90’s(good and bad).  Anyways, this past weekend, I received two chokers that I ordered from Forever 21 to wear with a specific outfit. I ordered black to be safe & burgundy hoping it would match the heels I was going to wear. It ended up matching perfectly, so I went with that one. Long story, short, I got so many compliments and messages about the chokers after I shared them on Instagram and Snapchat- especially after I shared the PRICE!!! Both chokers were under $10 total!  So without further ado…… here are links to both chokers. What I love most about these chokers, is that they are dainty and appear to wrap around the neck. I think they are so cute and bring an element of style to a look without overpowering it like a large ribbon type of choker could.

Faux suede Choker with chain detail $4.90

choker-2

Faux suede wrap choker with bow detail $3.90

choker-1


Reed Krakoff for Kohl’s

15 Apr

Former Coach creative director Reed Krakoff has designed a collection for Kohl’s that will be completely accessable to the masses. The designer, whose signature collection included handbags priced in the $1,000 to $3,000 range, has created the limited-edition Reed for Kohl’s collection, priced between $15 to $129. Krakoff calls the line “the new accessible luxury” and the designer will feature his signature handbag shapes and prints in the affordable new collection. The collection includes keychains, pouches, handbags and Apparel. Below are some of my favorites! Shop Reed for kohl’s online NOW or in stores starting April 21.

Reed1Reed2Reed4Reed5

Bar Cart Style! (Updated)

14 Mar

Hallelujah, I have finally finished styling my bar cart! I didn’t know exactly how I wanted to style it when I first started, all I knew was that I wanted a gold cart with 3 shelves. I started brainstorming and decided on a mostly pink and gold palette. As far as what to put on the shelves, I had to have a cute ice bucket and a pitcher with roses, everything else came to me as I went along. Bar carts are popping up everywhere and for good reason!  They are a fun way to showcase your personality and style, while being totally functional at the same time. When I have people over, my cart will be put to very good use. I love fresh flowers, pink and gold- my bar cart is all of that and more. To say I’m obsessed would be an understatement!

  Now, let’s get to the important stuff…..where did I find everything and how much did I spend?

Let me start by saying if you google ‘bar cart’ right now, you will quickly notice that they can be upwards of $500+!! For the cart alone! BEFORE you style it with all your fun trinkets, alcohol, mixers etc. Let me also tell you that if you really look, you CAN FIND AN AFFORDABLE CART! Check out these Prices below…..I spent under $300 for everything pictured including liquor and mixers.

*Bar Cart $150( I got it on sale for $119), Ice Bucket with tongs $30, silver cocktail spoon $3, Silver muddler $5, glass fruit bowl $2. All from Cost Plus world Market.

*Pitcher/Vase $8 at Home Goods.

*Crystal Decanters $40(I got them on sale for $20)each at Macy’s

*Corkscrew and shaker I already had, but you can find them at Bed Bath & Beyond.

*Mason jar $1, pink straws $5, Glass sugar bowl with lid $4, Key shaped bottle opener $4 all  from Target.

*Hand stamped decanter tags $10 each at Etsy shop Seize the night designs.

*Booze and mixers all from Total Wine

*Roses $7 at Trader Joes


Styling tips: Stick to 2-3 main colors. Fresh flowers are always a good idea and I really love the look of fruit as well. Fill the shelves, but don’t overpack them. Make it your own, add personal touches.

UPDATE: Pink sugar cubes have arrived and are in the tiny glass bowl with lid, I also purchased teeny tiny tongs from Crate &Barrel.

My Bar cart is complete!!!!

Custom sugar cubes available at Etsy shop Heather Holidays.


Affordable Spring Bags!

8 Mar

Looking for a great festival bag or an easy breezy bag for the warmer months? Well, I stumbled upon the cutest bags at Forever 21 this weekend. One is a small cross body bag with tassel detail, and the other is a clutch with fringe detail. Both bags are perfect for Spring & Summer and match everything. Priced under $33, they are budget friendly as well.


Genuine suede fringe clutch $32.90

Crossbody bag with tassel detail $17.90

clutchtassel

Sweater Sale!

23 Jan

H&M is having a great sale right now! My new favorite oversized cozy ’78 sweater is only $9.99!!! Everything from dresses to shoes to bags to pants are on sale as well. Check it out.

78

How perfect is this sweater for super bowl sunday?! H&M ’78 sweater78


Affordable Ring Stack Alert!

19 Jan

Seriously you guys, How cute is this ring set from Madewell?

set1

I happened to stumble upon it while shopping at the Madewell store yesterday. I have been obsessed with Madewell’s jewelry for some time now. I love the finish of their gold rings and bracelets-It’s like a brushed, antique gold tone. It seems to compliment all of my other jewelry and definitely looks expensive. The great news, is that Madewell rings are affordable! The even better news is that this particular stack is on sale now for an additional 30% off!  original price$28, on sale for $20 online. If you shop in store, you can take an additional 30%off  and that brings these cuties down to $14!!!!!!  Come on….. let’s be ring twins!

Shop ring set HERE.

set2


Fall’s Must Have Hat Under $20

4 Nov

Fedoras are a Fall must have, I wear them year round but am particularly fond of them during the cooler seasons. Fedoras work on everyone, even if you think you’re not a hat person. Fedoras can pretty much be worn with any hairstyle, I wear mine with my hair down, with a side braid and with a low bun.  If you love fedoras, you’ll love my selections below, all under $20 of course. And at these prices, even if you’re not a hat person, now’s the time to step out of your comfort zone and get your first fedora. It’ll look great on you, I promise:)

Xo, Journey

Shop Fedoras Below.

Solid black.

Navy blue.

Black with brown sash.

Camel with brown sash.

Burgundy with faux leather trim.

Grey with faux leather trim.

f21 black navy f21

black with sash brown sash burgundy grey

My 5 Favorite Fall Lipsticks. (Including a gorgeous $1 red!!!)

23 Sep

Fall is officially here y’all and I’m so excited to wear richer colors, layers and gorgeous textures.  Fall makeup looks are some of my favorite hands down and beautiful lipstick is a staple for me during the fall. I’ve chosen my favorites and linked them below. I will list them from lowest $ to highest $$.

Happy Fall,

Xo Journey

Wet n Wild Cherry frost 514A $1. Super pigmented silky red with a slight shimmer .

wet n wild

NYX Lala $3.99. Creamy mauve/Plum.

NYX Lala

Maybelline Brazen Berry $7. Pretty purple meets magenta.

Brazen Berry

MAC Rebel $17. My favorite lip color of all time is a beautiful bold berry.

Mac Rebel

MAC Girl About town $17. The perfect bright fuchsia.

Mac GAT

My Favorite Summer to Fall Transition Look.

16 Sep

Here in California, seasons can be tricky because we don’t really have any. September cools down somewhat but overall we  experience an endless Summer while the rest of the country is quickly cooling down. This is when my favorite end of summer look comes into play- Good ol’ blue jeans and a white shirt! (T- shirt or button up) I wear this outfit with or without a white blazer and with shoes ranging from white chucks to strappy heels. It really is the perfect end of summer look when it’s just cool enough to bust out your jeans, but not cool enough for rich colors, textures or Fall layers.

Find inspiration below and check out Yourstylejourney on Instagram to see how I styled my personal blue jeans & white T look.

Shop:

White V neck

White button up

Ripped Jeans

White blazer

blu

Gallery Wall Success!

24 Aug

Gallery walls are having a major moment right now. Gallery walls are basically an arranged artistic display of things that matter to you most including mirrors, pictures, arts & crafts, frames, Initials etc. There are really no rules when it comes to a well hung gallery wall, it’s really all about what you think works for your space.   I recently finished my gallery wall and have some tips that I want to share with you that made it easier for me.

Gallery walls are a process (mine took 6 weeks to complete) but don’t fret, YOU GOT THIS! One picture at a time.

Supplies & Art:

Hammer & nails, tacky glue, mounting putty (behind the frames that wouldn’t stay put), gold paint, sandpaper (to distress some of the frames)

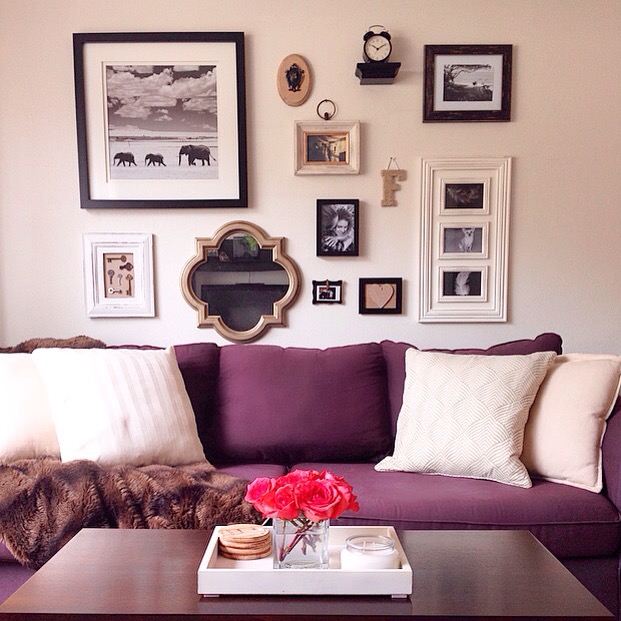
*Mirror, clock, and framed elephant art available at Target.

*Twine wrapped Letter ‘F’, gold paint, decorative keys, tweed heart, and oval wood piece with keyhole ceramic piece all available at Michaels.

*Weathered brown frame (upper right) available at West Elm.

*All other frames available at Home Goods.


Gallery Wall Tips:

* Check Pinterest and Instagram Check these sites for gallery walls to see what styles, colors and arrangements you like.

*Everyone Can afford a gallery wall: My gallery wall pictured above includes only 2 pricey pieces, the rest are super affordable pieces (hello $25 mirror) mixed with DIY stuff.  Don’t let your budget stop you! Also, Don’t limit yourself to only store-bought items. If you love a particular frame in your home, you can paint it to match your theme. There are youtube tutorials for EVERYTHING and you can watch step by step videos on sanding, staining and painting frames.

*Make it your own: pick a color palette. I chose ivory, black & gold. All of your art doesn’t need to match, but having 2-3 primary colors makes it more cohesive when completed. I also went with only black & white prints and photos to keep things uniform.

*Don’t be afraid to use different frames: Different sizes, shapes & colors only add to the greatness of your gallery wall.

*Lay it out:  I cannot stress enough to lay out your gallery wall arrangement BEFORE putting anything on the wall. I layed mine out on the floor, changed it around a few times, took pictures and compared the pictures until I was happy with the arrangement.

*All in the family: Tie your gallery wall colors in with your surrounding couch, blankets, coffee table, and throw pillows. This keeps everything cohesive within the space.

*Hang time: Hang your artistic representation any way you want. I keep reading all sorts of rules about arranging your gallery wall, but just remember- it is YOUR gallery wall so hang it how you want. As long as it’s balanced with shapes & spacing, your gallery wall will be just fine. Speaking of spacing: The wall is your friend- the space between your art is just as important as the art itself. I started with putting my largest piece up and went from there. I chose to not put the largest piece dead center. I feel like that would be expected and it can cause your eye to be drawn toward that piece and not all of the fun stuff around it.

Breathe: You can do it!